Open SSO Advanced Configuration
Open SSO is having a lot of feature, let’s learn about Open SSO configuration more detail here.
Table Of Contents
- 1. JWT
- 2. Database
- 3. Cache
- 4. Domain
- 5. Website
- 6. Prevent BOT and SPAM
- 7. Mailer
- 8. Template
- 9. Static Cache
- 10. Sign with Google
- 11. Sign with Apple
Learn more
Configuration
Application will read file config.js for the configuration. But there is a config.default.js where is the default configuration which is you can use it for backup in case you broke the current configuration.
Here is the full example default configuration file.
|
1. JWT
Open SSO use JWT for whole authentication. You have to generate new private.key and public.key, the easy way is you can grab it from https://jwt.io. Make sure the algorithm is same.
a. Config JWT
Default JWT configuration is
|
Note:
- It’s better for you to use minimum 8 hours. Because we don’t have a refresh token. When the token expired, they need to relogin.
b. Generate New private.key and public.key
When you are in micro services, you have to use same private.key and public.key, so the token will verified in all nodes.
To generate new private.key and public.key,
- Run this command below in your terminal
|
- Done, the old
private.keyandpublic.keyfile will be replaced automatically.
2. Database
Open SSO support multiple databases. The default is using SQLite3.
Here is the example database configuration:
a. SQLite3
|
b. RDBMS
|
Note:
- If you are using RDBMS, you have to restore the database.
3. Cache
Open SSO support to using multiple kind of cache engine. You can use memory, file and redis. But the default is using memory which is not working when application in cluster or in microservices. Our recomendations is using redis for best performance, scalable and works in all environment.
Here is the example configuration:
a. Redis
|
b. Memory
|
c. File
|
4. Domain
You are able to change the domain, baseUrl and baseAssetsUrl must be same.
|
Note:
baseAssetsUrlrefer to public directory. You can change this to your CDN.
5. Website
You are able to change the website information.
|
Note:
- This configuration only affect in template engine.
6. Prevent BOT / SPAM
Open SSO could prevent bot / spam, you have to activate this feature.
|
Note:
- OpenSSO using reCaptcha v3.
- You have to get the reCaptcha
SiteKeyandSecretKeyat here.
7. Mailer
Open SSO using mailer for activate user, send message contact, forgot password, etc. So you have to activate this.
|
Note:
recipientEmailAddress= message from contact us will be delivered to here.- I recommend to use Zoho Mail, because it’s very easy.
- If you need custom configuration, please see » https://nodemailer.com.
8. Template
a. Theme
There is only one default theme. If you want to change the theme, you have to edit this
|
I’m not promise but maybe in the future I’ll release another template.
b. Minifier
To get the best performance, Open SSO having html cache and also support compression.
|
Note:
- When
isProductionset to true, HTML cache will running, this will reduce server to render the template. - When
useHTMLMinifierset to true, HTML source will be minified. Javascript inline also will be minified but not 100%.
9. Static Cache
Static cache is different with Cache. This Static cache only cache the page that rendered by template engine and file static located inside public directory.
|
Note:
maxAgeStaticCache= cache for regular static pages (default is 1 day in seconds)maxAgeAssetsCache= cache for assets ( default is 30 days in seconds)- NGINX will follow this rule by default. You don’t have to create custom cache configuration for this in NGINX.
10. Sign with Google
Open SSO support Sign in with Google. You have to activate this.
|
Note:
- You can use random string for
access_key. - You have to get the
client_idandclient_secret.
How to get the client_id and client_secret:
- Go to Google Credentials Page.
- Click Create credentials > OAuth client ID.
- Select the
Web applicationapplication type. - Name your
OAuth 2.0client and clickCreate. - Done, now you already have the
client_idandclient_secret.
11. Sign with Apple
Open SSO support Sign in with Apple. You have to activate this.
|
Note:
- You have to get the
clientIdandredirectURIfrom Apple Developer. - You require to have apple developer licensed to use this feature.
How to get the clientId and redirectURI:
- Open Your developer console and find
Certificates IDs & Profiles. - Click the
plus symbolto create a newApp ID. - Once you had the
App IDnow go back to the developer console andcreate a new identifier. This time selectServices IDs. - Once your new
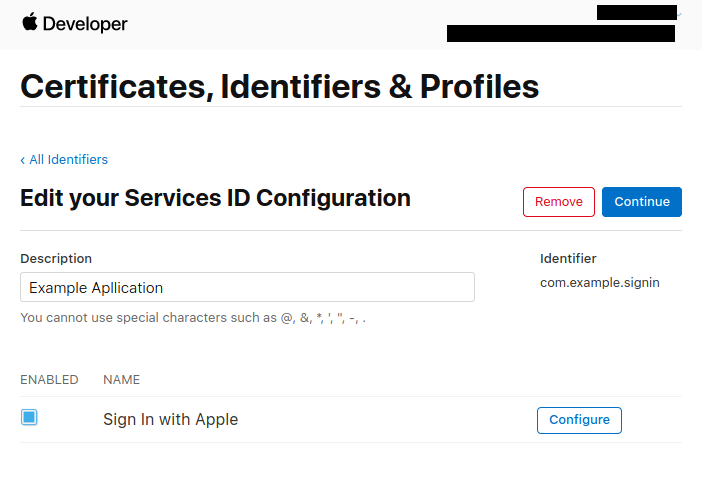
Service IDis created, find it then click on yourService IDthat you just created. - You’ll be greeted with a checkbox that say
Sign In with Apple. now click onConfigure.
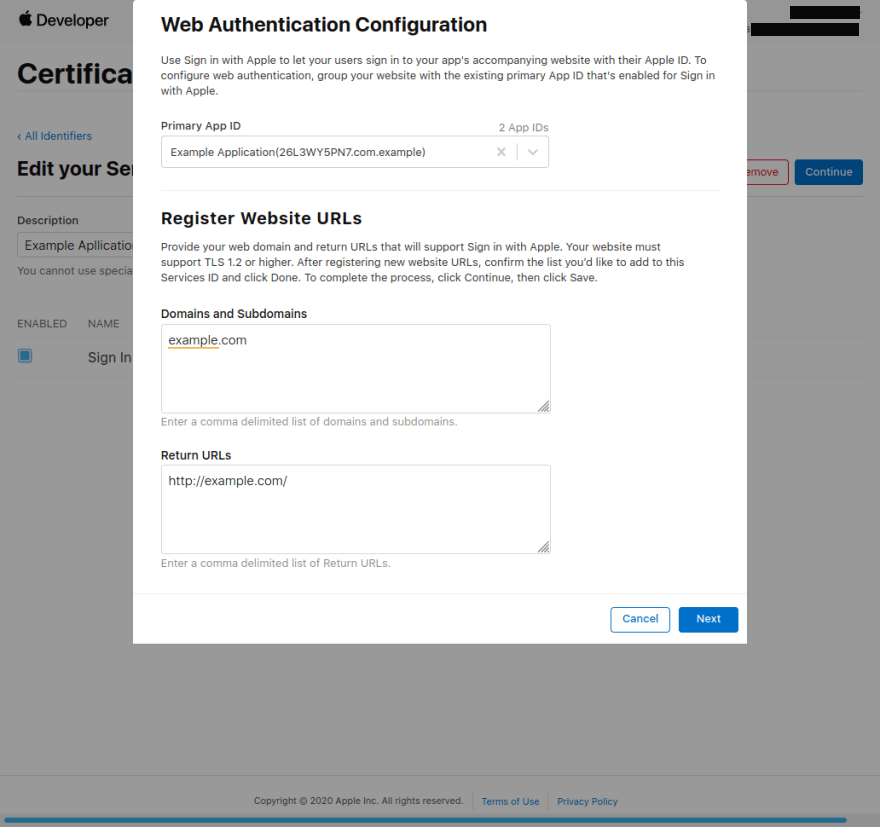
- A modal will pop up,
- As your Primary
App ID, choose the one that we just created in the previous section. - In the domains section add the domain where OpenSSO live, i.e
example.com. - The
Return URLis the location to which apple will redirect us after authentication is completed. This is also the location where apple will send the user data after authentication. Apple will send a POST request to this URL, but Open SSO using PopUp mode, so you just write it with yourdomain.com is enough. I’ve assigned http://example.com assumed that OpenSSO web is live on http://example.com.
- Click Next and Done.


